

How to: Mixcast VR.
A well made virtual reality project can be an amazing, mind-opening experience… for the person immersed within the headset. For onlookers on the other hand – those witnessing someone else having the time of their lives – the degree of amazement is often significantly reduced.
The obstacle that many virtual reality developers (and companies that have commissioned their own VR projects) face, is how to effectively convey a VR experience without needing to rely on in-person demonstrations.
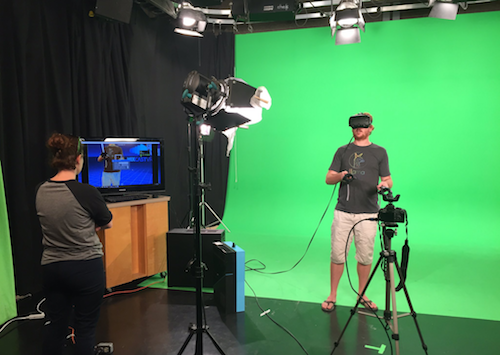
Our team recently encountered this hurdle during the creation of our 2016/2017 production reel. We found that simply recording footage from the user’s point of view – while still compelling – didn’t quite capture the full power of the experience. We wanted people to actually see users immersed in the virtual worlds we’ve created. For this purpose, we decided to capture footage with the help of MixCast VR.
MixCast VR enables developers and consumers to broadcast and record mixed reality videos from within VR. The tool essentially combines footage of the virtual world that person is experiencing and seeing (captured through the eyes of the VR headset), with the footage of that person using virtual reality (captured through an additional external camera), and blends them together in real-time. For a more visual description, below is a snippet of the footage we captured using MixCast VR:
While we ended up with a production reel that the entire team is very proud of – as a result of it being our first time going through the process, setting up MixCast VR and capturing our footage also involved small doses of roadblocks, back-tracking, and troubleshooting (that when paired with a tight time window on our studio rental, helped fuel exhilarating rushes of adrenaline)!
To ensure that things run nice and smooth when we are ready to capture footage of our next project, we documented our MixCast VR process into a step-by-step checklist. If you are planning to record VR footage of your own, considering using MixCast VR, or are simply interested in learning more about what’s involved, we hope you’ll find this guide helpful.
Guide Assumptions:
- Your VR project is in Unity
- You are using an HTC Vive to run the project during filming
Important Things You Will Need:
- Green screen
- DSLR Camera (another type of camera, or computer webcam can work too)
- Camera tripod
- HTC Vive (Headset, Controllers, Lighthouses, etc)
- Vive Tracker
- Computer with monitor
- Lights (to illuminate the green screen & filming area)
- Sunglasses (to avoid being blinded by the lights)
- Capture Card
- Chargers & Spare Batteries (for the Vive controllers and camera)
- Long HDMI cables & adaptors (for connecting camera with computer, and computer with monitor)
- Plain dark clothing and tidy hair
How to Record Virtual Reality with MixCast VR: Step-by-Step Guide
INTEGRATE THE SDK
1. Integrate the MixCast VR SDK
- Grab the latest version of MixCast VR’s SDK here.
- Import it into your Unity project.
- Watch this video from the team behind MixCast VR for more.
SET UP YOUR STUDIO
2. Setup the green screen
- Make sure your green screen is wide enough to fully cover the camera’s field of view. If you intend to show room space or flying, the green screen should also cover the floor beneath the VR play space.
3. Let there be light!
- Make sure your recording space is well lit.
- We rented out a local tv station’s green screen space, including full production lighting, to ensure the sharpest video quality possible.
- Tip: Wearing plain, dark clothing helps your actor stand out from the green screen.
4. Remove Camera UI Overlays
- If your camera has an unclean HDMI out, you will need to remove any camera UI overlays to prevent them from cluttering your footage.
- We used a mid-range DSLR camera for our filming – and it worked great.
5. Setup your camera and attach the Vive Tracker
- Place your camera on a tripod at the edge of the VR play area, facing the green screen.
- Connect the camera to the computer (we discovered that we needed a Capture Card to take the HDMI signal from DSLR to computer)
- Attach the Vive Tracker (we used the hotshoe for this)
- The Vive Tracker enables your camera’s position to be recognized – meaning you can actually move the camera around during filming (a 3rd Vive Controller also works in place of a Tracker)
6. Setup the Vive Lighthouses
- Ensure the space between the lighthouses is centred in front of the green screen, and also that the lighthouses are not obstructing your shots.
7. Run the Vive Room Setup
- Create your VR room without having it extend beyond the width of your green screen.
- Keep in mind the room orientation in relation to the position of the camera when indicating where your monitor is (getting the dog to face the camera at a diagonal required much trial and error on our end).
8. Pair the Vive Tracker
- After everything else is setup, pair the tracker using the SteamVR > Config > Pair Controllers option.
- We discovered that you need to pair the tracker as the last step, so that it isn’t confused for one of the two primary controllers.
SET UP MIXCAST VR
9. Instal MixCast VR Studio in Steam
- Find this here.
10. Launch MixCast VR Studio in desktop mode
11. Turn on the camera
- Ensure that the camera’s entire field of view is within the green screen.
12. Select your device
- Devices are listed in the drop-down menu located in the bottom left of MixCast VR Studio.
- By default, the first available device will be selected.
13. Set your Field of View
- The MixCast VR Studio already has FOV data for the most common cameras in its database – click the cloud icon to attempt automatically retrieving yours.
- If after clicking the cloud icon the numbers change, this worked, and you can move on.
- If not, you can search for your camera’s FOV information online.
14. Key the green screen
- Use the MixCast VR Studio “chromakeying” options (also located in the bottom left) to key out your green screen.
- Test the quality of this by having someone walk into the green screen space (if the edges of their clothes are clearly defined, you’re good to go!)
15. Align your virtual camera
- This step is done in VR – so put on the Vive headset.
- First, move the output display visible in VR to the position of your real-world camera.
- Then, use your controller to click the areas around the output display, and adjust the alignment until your virtual and physical controllers overlap each other.
For more detail on this step, and the entire “setting up MixCast VR” phase, watch this how-to video made by BluePrint Reality.
RECORD YOUR VIDEO
16. Launch your VR project
17. Add MixCast VR
- Have someone click the white “>>>” icon in the bottom right of the desktop window.
- You should now have a VR and Live Feed Composite visible on the desktop.
18. Record!
- Capture your footage using MixCast VR, or your desktop recording software of choice.
- We made all our recordings using Shadowplay.
- We also lost a fair bit of footage due to having left the mouse cursor in the middle of the screen – be sure to hide this, along with any desktop popups obstructing the video.
Recording a virtual reality project with MixCast VR for the first time can seem like a complex process, but if you methodically follow these steps, and stay positive during first-attempt troubleshooting, the results can be very rewarding!
LlamaZOO Production Reel – 2016/17 – including Jetson VR footage captured with MixCast VR


